
Anubias care comes down to one rule that beginners break constantly, and it is the difference between a plant that lives for years and one that quietly rots away: never bury the rhizome. Anubias — especially Anubias barteri var. nana and the tiny nana ‘petite’ — is widely regarded as one of the easiest, most beginner-proof aquarium plants you can buy. It is slow, tough, undemanding, and perfectly suited to nano, betta, and shrimp tanks. But it is not planted the way most greenery is, and that single quirk trips up more new hobbyists than any pest or parameter ever will.
Most anubias guides hand you a vague “attach it to a rock” line and move on, never explaining why the rhizome must stay exposed, which attachment methods actually work, or what to do when leaves suddenly melt after a water change. This guide fills that gap. It puts the rhizome rule front and center, compares every realistic attachment method in an original table, gives you honest light and fertilizer numbers, and walks through melt, algae, and propagation so your anubias stays glossy and dark green instead of slowly disappearing under the gravel.
Anubias Care Starts With the Rhizome Rule
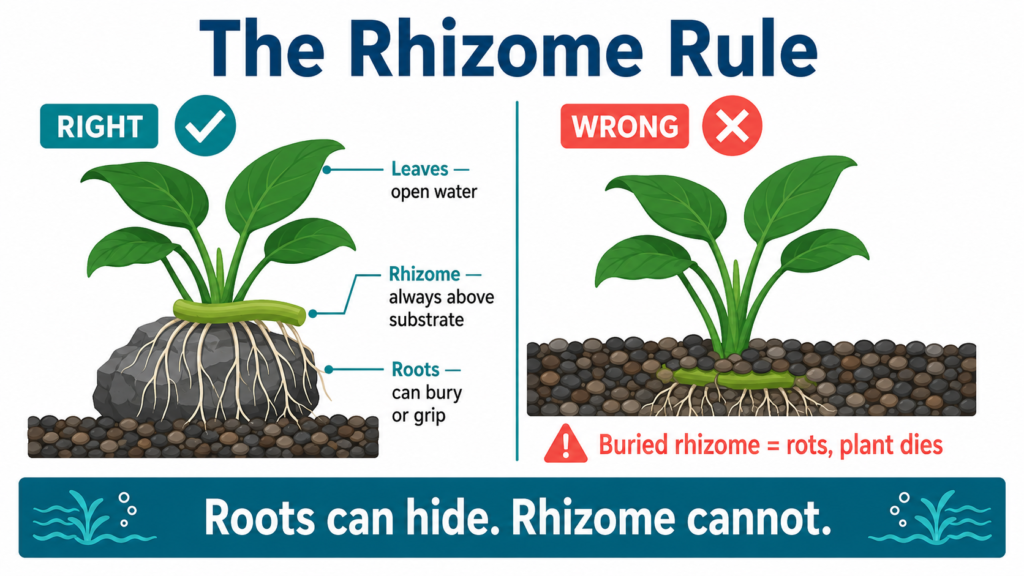
The single most important thing in anubias care is knowing what a rhizome is and leaving it alone. The rhizome is the thick, horizontal green stem that runs along the base of the plant — the part that every leaf and every root grows out of. It is not a root and it does not want to be buried. If you push the rhizome down into your substrate the way you would plant a stem or a bulb, it suffocates, rots from the middle, and the whole plant dies. This is the number-one killer of anubias, and it is completely avoidable.
So the rule is simple: the rhizome must always stay above the substrate, out in the open water. Because you cannot plant anubias in gravel or sand, you attach it to hardscape instead — driftwood, rock, or any decor with a surface the roots can grip. The roots themselves can go into a crevice or bury slightly; they do not rot. Only the horizontal green stem needs to breathe. Once you internalize that one distinction — roots can hide, rhizome cannot — anubias becomes almost impossible to kill.
| Part of the plant | What it is | Where it goes | If you get it wrong |
|---|---|---|---|
| Rhizome | Thick horizontal green stem | Always above substrate, in open water | Buried = rots and the plant dies |
| Roots | Thin pale strands from the rhizome | Into a crevice, or lightly into substrate | Fine buried; they grip hardscape over weeks |
| Leaves | Broad, tough, dark-green blades | Above the rhizome, in the water column | Under strong light they coat with algae |
| Growth point | Tip of the rhizome pushing new leaves | Leave undisturbed | Damaged = slow or stalled new growth |
Keep that table in mind and the rest of anubias care is genuinely easy. Everything else — light, fertilizer, CO2 — is forgiving. The rhizome is the one thing you cannot get wrong.
How to Attach Anubias to Driftwood or Rock
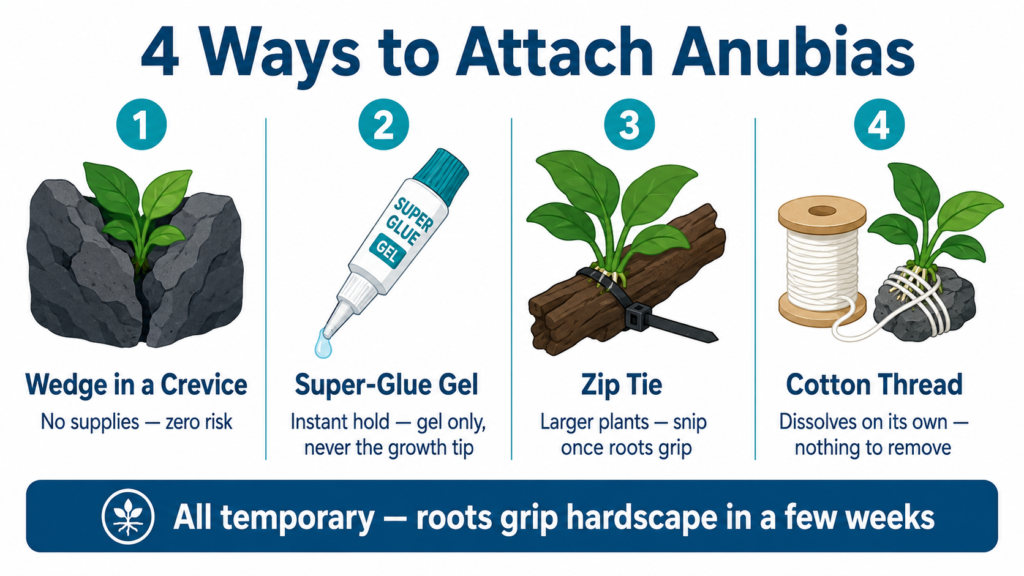
Since you are not planting anubias, you are mounting it. There are four reliable ways to fix the rhizome to hardscape, and all of them are temporary — the plant’s own roots take over within a few weeks and grip the surface permanently, at which point you can remove whatever you used to hold it. The gentlest method is no glue at all: simply wedge the roots and rhizome into a natural crevice in your driftwood or between two rocks and let the roots anchor themselves over time.
For a firmer, instant hold, a dab of cyanoacrylate super-glue gel (the same active ingredient as aquarium-safe plant glue) bonds the underside of the rhizome to wood or stone in seconds — use gel, not runny liquid, and glue the rhizome itself, never the growth tip. Prefer no chemicals at all? A thin zip tie or a few wraps of cotton thread will lash the rhizome down just as well; cotton thread even dissolves on its own after a few weeks, so there is nothing to remove. Whatever you choose, the goal is the same: hold the rhizome flat against the surface, leave it exposed, and wait for the roots to do the real work.
| Attachment method | How to do it | Best for | Notes |
|---|---|---|---|
| Wedge in a crevice | Tuck roots and rhizome into a gap in wood or rock | Beginners, no supplies | Zero risk; roots anchor in a few weeks |
| Super-glue gel | Small dab of cyanoacrylate gel under the rhizome | Instant, permanent-feeling hold | Glue the rhizome, never the growth tip |
| Zip tie | Loop a thin tie around rhizome and hardscape | Larger plants, slick surfaces | Snip and remove once roots grip |
| Cotton thread | Wrap a few turns to lash it down | Rock, mesh, delicate mounts | Dissolves on its own; nothing to remove |
Because anubias attaches to hardscape rather than rooting in the substrate, it is a natural fit for aquascapes built around wood and stone. If you are planning a layout, our guide to nano aquascaping ideas shows how anubias-on-driftwood becomes a centerpiece, and it pairs beautifully with a carpet of java moss on the same hardscape for a lush, layered look.
Light, CO2, and Fertilizer: Keep It Modest
Anubias is a low-tech plant through and through, and here more is genuinely less. Give it low to medium light — nothing more. Under strong, bright light, its famously slow-growing leaves become prime real estate for algae, which settles on the tough blades and stays there because the leaf itself takes months to replace. A modest light level keeps the leaves clean and dark green, and it is exactly why anubias thrives tucked in the shade under taller plants or driftwood overhangs.
You do not need pressurized CO2. Anubias thrives in a plain low-tech tank with no injected carbon at all, which is part of what makes it such a stress-free beginner plant — if you want the full picture on when CO2 does and does not matter, our explainer on whether aquarium plants need CO2 covers it. Liquid fertilizer is a bonus rather than a requirement: because anubias feeds from the water column through its leaves, a general liquid fert can speed things along, but the plant will grow perfectly well without it. And because it is a genuinely slow grower, the smartest money-saving tip in all of anubias care is to simply buy the size you actually want — do not expect a tiny petite to fill a tank quickly, because it will not.
| Care factor | Recommendation | Why it matters |
|---|---|---|
| Light | Low to medium only | Strong light coats slow leaves in algae |
| CO2 | Not needed | Thrives low-tech; injection is optional at most |
| Liquid fertilizer | Helpful, not required | Feeds from the water column via its leaves |
| Substrate | Irrelevant to feeding | Attached to hardscape, not rooted for nutrients |
| Growth speed | Slow — buy the size you want | Small plants take a long time to fill in |
| Placement | Shade, foreground, or midground | Low-light tolerance suits tucked-away spots |
Its low-light, no-CO2 toughness puts anubias in the same easy tier as the hardiest greenery in the hobby — the same short list you will find in our roundup of the best low-light aquarium plants for beginners. If a plant can survive neglect, anubias is usually on the list.
Anubias Melt, Algae, and Propagation
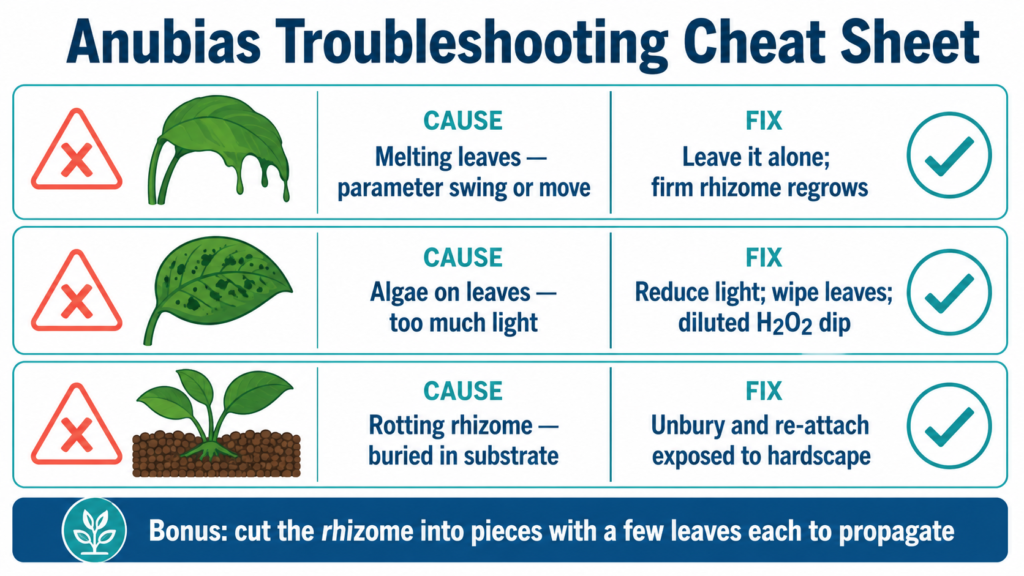
Sooner or later you will see it: leaves that suddenly go soft, translucent, and mushy, sometimes just days after you moved the plant or changed something in the tank. This is “anubias melt,” and it looks alarming but usually is not fatal. Drastic parameter swings, a move to a new tank, or the shock of transitioning from an emersed (grown-above-water) nursery form can all trigger it. The key is patience: as long as the rhizome stays firm and green, leave the plant alone. The rhizome nearly always pushes fresh new growth even after most of the old leaves have melted away. Resist the urge to keep relocating it — more disturbance just prolongs the melt.
Algae on the leaves is the other common complaint, and it is usually a light problem in disguise. Because anubias leaves are so slow to grow and so long-lived, any algae that lands tends to accumulate. The first fix is prevention: dial the light down and keep the plant out of the brightest spots. For algae that has already taken hold, gently wipe the tough leaves with your fingers or a soft cloth — they can take it. For stubborn spot algae welded to the blade, some keepers do a brief, diluted hydrogen-peroxide or algaecide dip out of the tank, which the leathery anubias leaf tolerates better than most delicate plants would.
Propagation is refreshingly simple. To make more anubias, cut the rhizome into pieces with a clean blade, making sure each piece keeps a few healthy leaves and some roots of its own. Each division is an independent plant — attach it to new hardscape exactly as before, rhizome exposed, and it carries on growing. One healthy plant slowly becomes several, which is a satisfying (if unhurried) way to fill a scape for free.
| Problem | Likely cause | What to do |
|---|---|---|
| Melting leaves | Parameter swing, move, or emersed-to-submersed shift | Leave it alone; the firm rhizome regrows leaves |
| Algae on leaves | Too much light on slow-growing blades | Reduce light; wipe leaves; diluted H2O2 dip for spot algae |
| Rotting rhizome | Rhizome buried in substrate | Unbury and re-attach it exposed to hardscape |
| Wanting more plants | N/A — it’s a feature | Cut rhizome into pieces, each keeping a few leaves |
For a neutral overview of the genus, its species, and its native range across tropical West and Central Africa, the Anubias entry on Wikipedia is a solid reference. Results always vary with your particular tank, light, and water, so treat every guideline here as a starting point and watch how your own plant responds.
Keep Exploring NanoTank Lab
- Best Low-Light Aquarium Plants — the easy tier anubias belongs to, for low-tech tanks.
- Java Moss Care — another no-fuss, glue-to-hardscape plant that pairs with anubias.
- Nano Aquascaping Ideas — how anubias-on-driftwood becomes a scape centerpiece.
- Do Aquarium Plants Need CO2? — why anubias thrives with no injected carbon at all.
Frequently Asked Questions
Can you plant anubias in the substrate?
No — and this is the single most important rule of anubias care. If you bury the rhizome (the thick horizontal green stem) in gravel or sand, it rots and the plant dies. Instead, attach anubias to driftwood or rock and keep the rhizome fully exposed in the water. Only the thin roots may go into a crevice or lightly into the substrate; the rhizome itself must always stay above it.
How do you attach anubias to driftwood or rock?
Fix the rhizome to the surface and let the roots take over. You can wedge it into a crevice, use a small dab of cyanoacrylate super-glue gel, or lash it down with a thin zip tie or cotton thread. All of these are temporary — the plant’s own roots grip the hardscape within a few weeks, and you can then remove the tie or glue point. Just never glue or bury the growth tip of the rhizome.
Does anubias need CO2 or special lighting?
No to both. Anubias thrives in a low-tech tank with no injected CO2, which is a big reason it is so beginner-friendly. It also wants only low to medium light — strong light coats its slow-growing leaves in algae. Liquid fertilizer helps because anubias feeds from the water column, but it is optional, not required. Modest light and no CO2 is the sweet spot.
Why are my anubias leaves melting?
Melting is usually a stress reaction, not a death sentence. Drastic parameter swings, moving the plant, or the shift from an emersed nursery form to underwater life can all make leaves go soft and translucent. As long as the rhizome stays firm and green, leave the plant undisturbed — it almost always pushes new growth from the rhizome even after old leaves melt. Constant relocation only makes the melt worse.
How do you propagate anubias?
Cut the rhizome into pieces with a clean blade. Make sure each section keeps a few healthy leaves and some of its own roots, then attach each piece to new hardscape with the rhizome exposed, just like the parent plant. Each division becomes an independent plant. Anubias is a slow grower, so propagation is unhurried, but it is an easy and free way to fill out a scape over time.